Is your E90 BMW 328i or 335i leaving oil stains in the garage overnight? If so, the oil pan gasket is probably leaking. These cars are notorious for leaking from areas like the oil pan gasket, oil filter housing gasket, and valve cover gasket. This post will explain in detail how you can fix your leaking oil pan gasket at home without needing to throw away money at the dealership or repair shop.
N54 & N52 Oil Pan Gasket Replacement Guide

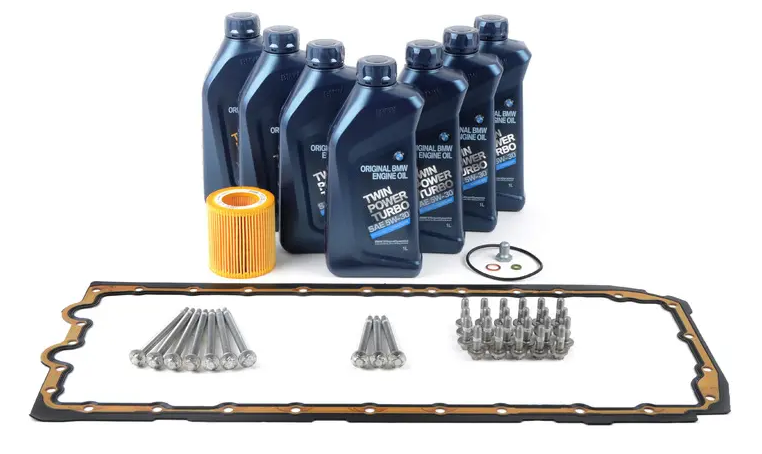
Parts required:
If you don’t want to run the BMW engine oil included in the kit above, you can purchase just the oil pan gasket kit with bolts and get the oil of your choice from your local auto parts store.
Tools required:
- Engine support bar
- Torque wrench (capable of going as low as 8nm which is 70in/lbs)
- Torx bits and Torx socket set (E12 for oil pan & engine mount bolts)
- Impact wrench
- Socket set (8mm, 10mm, 16mm, 17mm & 18mm)
- Various extensions and flex joints
- Gasket scraper
- Screwdriver set
- Jack stands and low profile floor jack
Step-by-step Guide
Step 1: Jack up the car and support it safely with the stands (front and rear), high enough to work under with the subframe hanging.
Step 2: Loosen the drain plug with a 17mm socket and drain the oil. I recommend allowing a lot of time so oil isn’t dripping on you while you’re underneath. I drained mine overnight, but that is not required.
Step 3: Remove the front wheels and unplug the headlight-leveling sensor on the driver-side lower control arm.
Step 4: Remove the plastic underbelly covers (8mm bolts) and the plastic covers behind each wheel (8mm & 10mm bolts).
Step 5: Remove the bolts securing the engine cover that are accessible. With these 2 or 3 bolts removed, you should have enough wiggle room to access the tow hook mount without completely removing the engine cover.
Step 6: Get the tow hook from the utility kit in the trunk and screw it into the the driver-side front corner of the cylinder head.
Step 7: Set up the engine support bar to get ready for unbolting the sub frame.
Step 8: Unbolt and remove the triangular bar beneath the sub frame.
Step 9: Remove the two bolts from each engine mount with an e-torx socket.
Step 10: Get the floor jack and place it under the large rear section of the subframe in the center.
Step 11: Remove the 6 bolts holding the sub frame. 3 bolts on the drivers side & 3 on the passenger side.
Step 12: Slowly lower the subframe until the jack falls away from it. The engine support brace and suspension struts will now support it.
Step 13: Disconnect the plug and ground wire for the oil level sensor.
Step 14: On the drivers side remove the bracket protecting the fuel & brake lines.
Step 15: Unbolt the power steering hose on the passenger-side front of the subframe. This will allow it to move for the oil pan later.
Step 16: Unclip the A/C pipe from the front of the engine.
Step 17: Remove all of the oil pan bolts with an e-torx socket. You can see mine leaking already after it was power washed.
Step 18: Remove the tube from the oil pan for the oil return line (which is a PITA!) Try your best to not break it. It has 4 clips locking it to the oil return pipe. I used a pliers to squeeze one way which unlocks 2 sides, at this point I placed a mini flathead screwdriver in to unlock the other 2, then wiggle the pan as you work them free.
Step 19: Remove the oil pan and put a drain pan under the engine to catch any oil still dripping. Clean the oil pan and remove the old gasket material using the scraper. Do the same to the engine block. Be careful not to damage the engine mating surface. Use parts cleaner to wash out the oil pan and engine block surface.
Step 20: Remove the oil level sensor and replace the o-ring gasket. Re-install into the oil pan.
Step 21: Once all is done and cleaned, use 2 small zip ties at opposite ends to hold the gasket to the oil pan for installation. You will cut and remove them later once you have a couple of bolts threaded in on opposite sides, but don’t put any bolts in until after the next step.
Step 22: When the oil pan is in place, reconnect the oil return tube. You will need to be able to move the pan a bit to get the oil return tube connected.
Step 23: Now you can put the bolts in the pan. Make sure to start them by hand to avoid cross threading them. These bolts don’t require very much torque!
Step 24: Once the bolts are snug, start torquing them from the middle and work outward in a criss-cross pattern. Torque them to 8nm (6ft/lbs or 70in/lbs) + 90° turn. I marked each bolt so I knew which were already done.
Step 25: Raise the subframe paying attention to the guides for it to line up. Put in all the mounting bolts but leave them loose for the subframe to move a little because you also need to line up the engine mounts (there is a small guide pin to help align them). Use a screwdriver to make adjustments. Once everything is aligned, start the bolts for the engine mounts.
Step 26: Tighten all the subframe bolts, then the engine mount bolts.
Step 27: Put everything else back together in reverse order. Fill your oil, but leave the plastic shields off. Start the car and check for leaks. If no leaks are present, install the plastic underbelly covers and enjoy your leak-free BMW!